TECHNIQUES of Encaustic Art    Return to HOME PAGE of www.encaustic,com     Visit one of our sponsor sites   
Iron,  Stylus & Hobby Crafts Methods Assemble a mini hotplate using the encaustic painting iron Hotplate Techniques Zone Hot Air Methods Zone Finer Art Approaches for Encaustic work
DEVELOPMENT
IRON & STYLUS
IRON AS
HOTPLATE
HOTPLATE WORK
HOT AIR WORK
ARTISTIC
WORK

ONLINE PROJECTS
Sealer for Wax : an acrylic varnish to protect wax art ...
Although polishing the wax is all that needs to be done to perfectly complete any encaustic wax artwork it is sometimes helpful to seal the surface with a tougher material.
This enables the wax artwork to be used in situations where it gets handled (greetings cards for instance) and adds protection to the fragile surface, making the artwork a more robust format for more practical uses.
First apply the wax colours to the working surface and finish creating your artwork. When this is completed you are ready to either polish the final piece or apply the sealer.
Polish the wax surface BEFORE the sealer is applied Polish the wax surface - this is very important before the sealer is applied.
apply the sealer using a soft brush

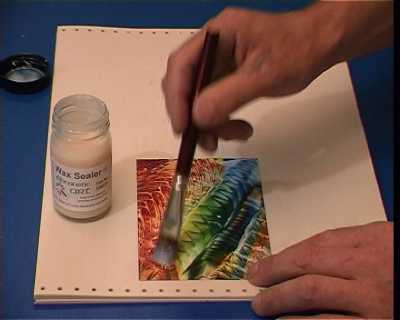
Use a soft watercolour brush to apply the sealer to the polished surface of wax colours.

Make sure that the liquid sealer is well worked over every part of the surface in quite a rough and random manner.

Work over the wet sealer in even strokes. Starting point... Now work over the wet sealer in regular even strokes to make the surface as smooth and "untroubled" as possible. If you make the strokes horizontally across the card it is easy to work from the top down to the bottom and keep the lines level. Here is the start of the stroke....
...ending point.... ... and here is the end.
continue the smoothing strokes Continue working these smoothing strokes over the entire surface of the piece, until you reach the bottom of the artwork...
.. fnal strokes for smoothing the wet wax sealer ... remembering to keep the brush marks parallel to the bottom of the card as you progress.
allow the sealer to dry , then it is finished.

Allow the sealer to dry (20 minutes to 4 hours depending on temperature and humidity), then the piece is finished.

You can add tints of acrylic colour to the sealer which will allow glazes to be applied over your encaustic work. Collage is also a great potential to explore, using the sealer as an all in one adhesive.

        GO TO Go to the index for encaustic art products OVERVIEW
Arts Encaustic Ltd, Glogue, Pembrokeshire SA36 0ED UK
  Tel: +44 (0)1239 831401               info@encaustic.com